

Before you start
- An active Twilio account that owns the phone number (DID) you want to import.
- Voice Geographic Permissions enabled for the destinations you will dial. In the Twilio console: Voice, then Settings, then Geo Permissions.
- For non-US numbers, such as AU +61 or UK +44, a Regulatory Bundle or Address attached to the DID. In the Twilio console: Phone Numbers, then Regulatory Compliance.
- For SMS, which is optional: the number must be SMS capable in your country. US numbers also require A2P 10DLC Brand and Campaign registration, under Messaging, then Regulatory Compliance, before they can send.
- Admin access to your Brilo workspace.
Steps
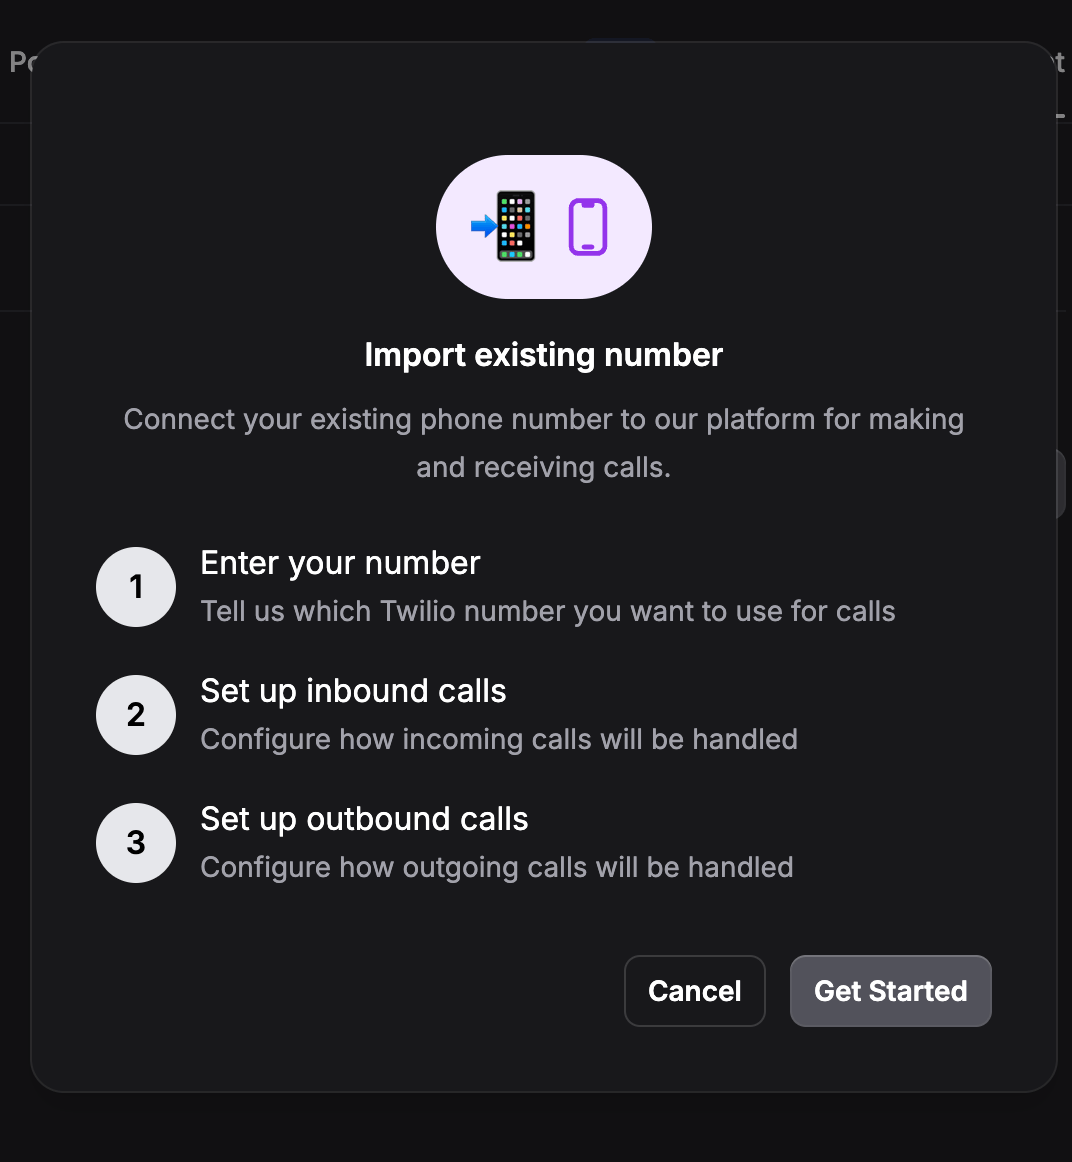
Start the Brilo import wizard
+12345678990, and select Twilio as
the carrier. Click Next.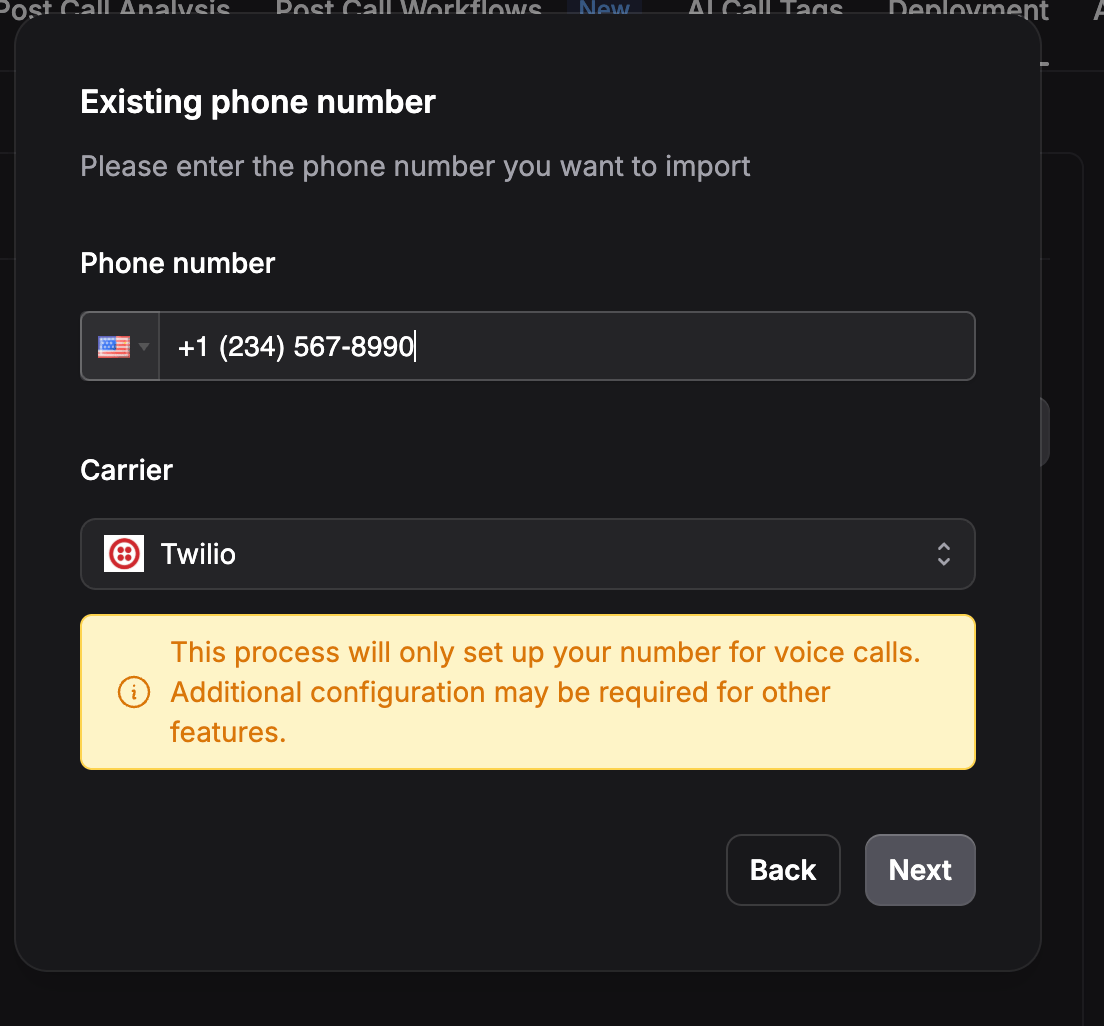
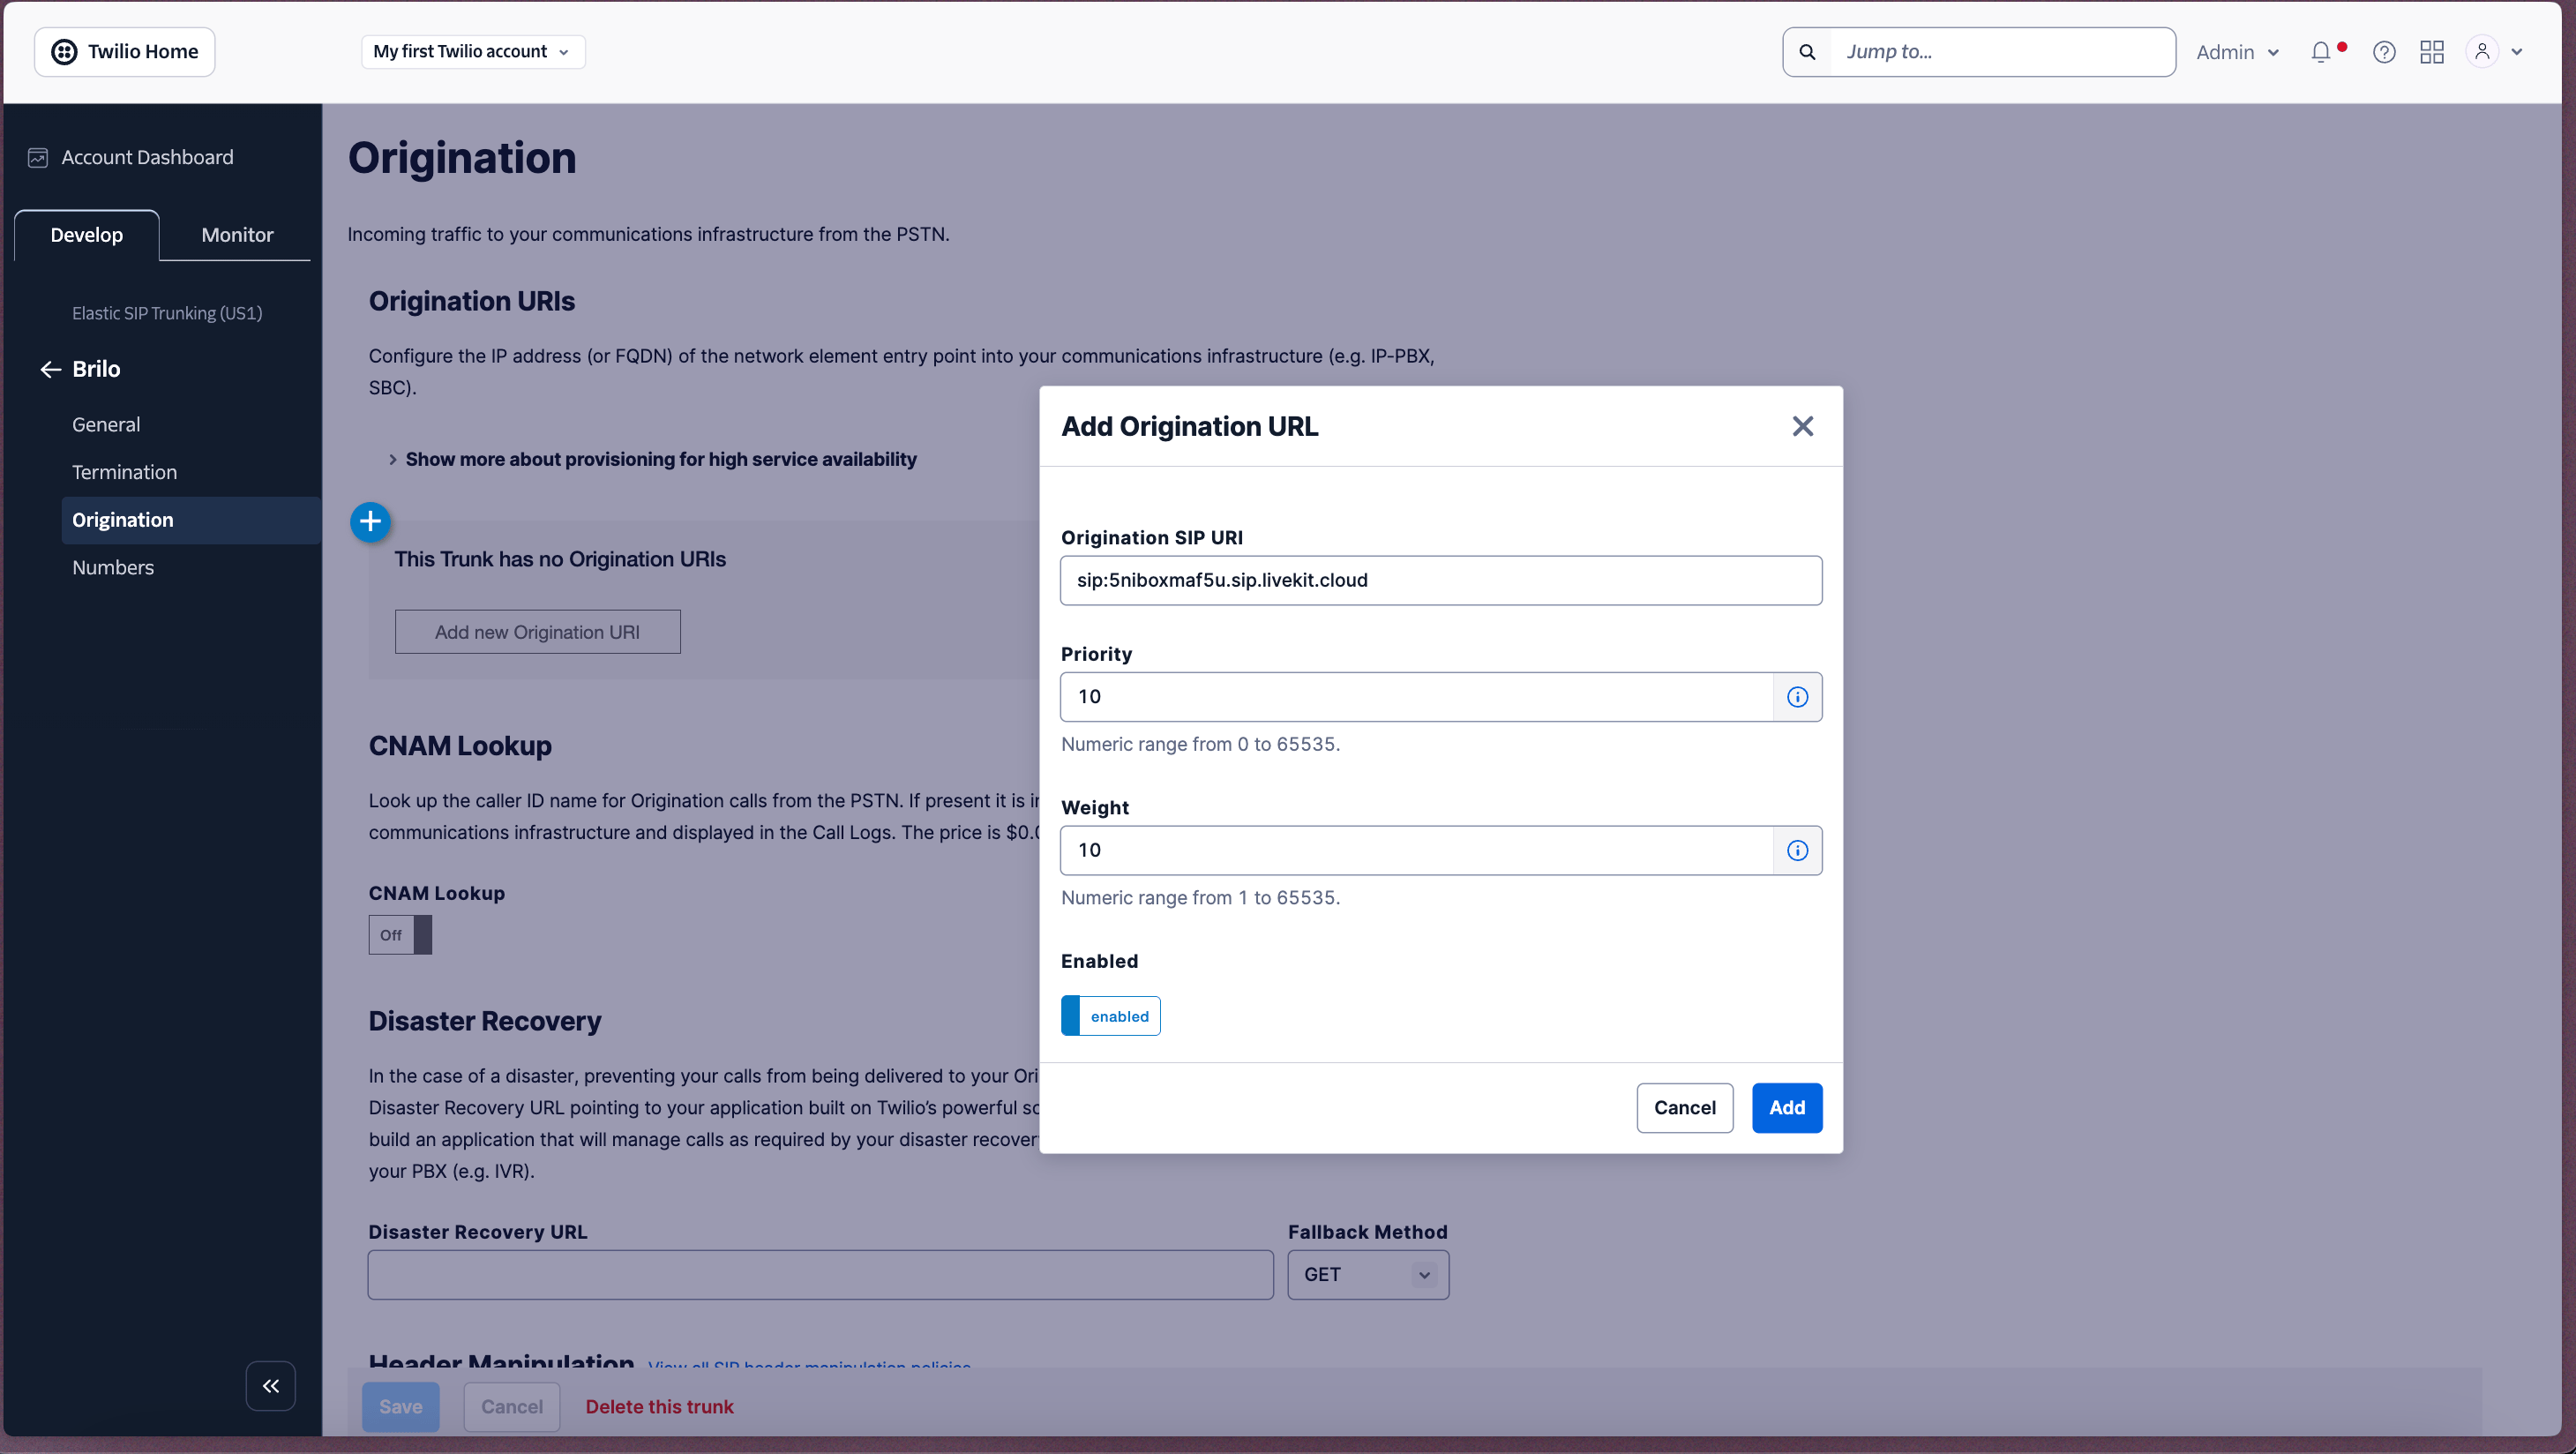
Copy your Origination URI
sip:abc123.sip.livekit.cloud.
This is the address Twilio sends inbound calls to.Copy it, because you paste it into Twilio in the next step. Keep this Brilo wizard tab open,
since you come back to it in step 7.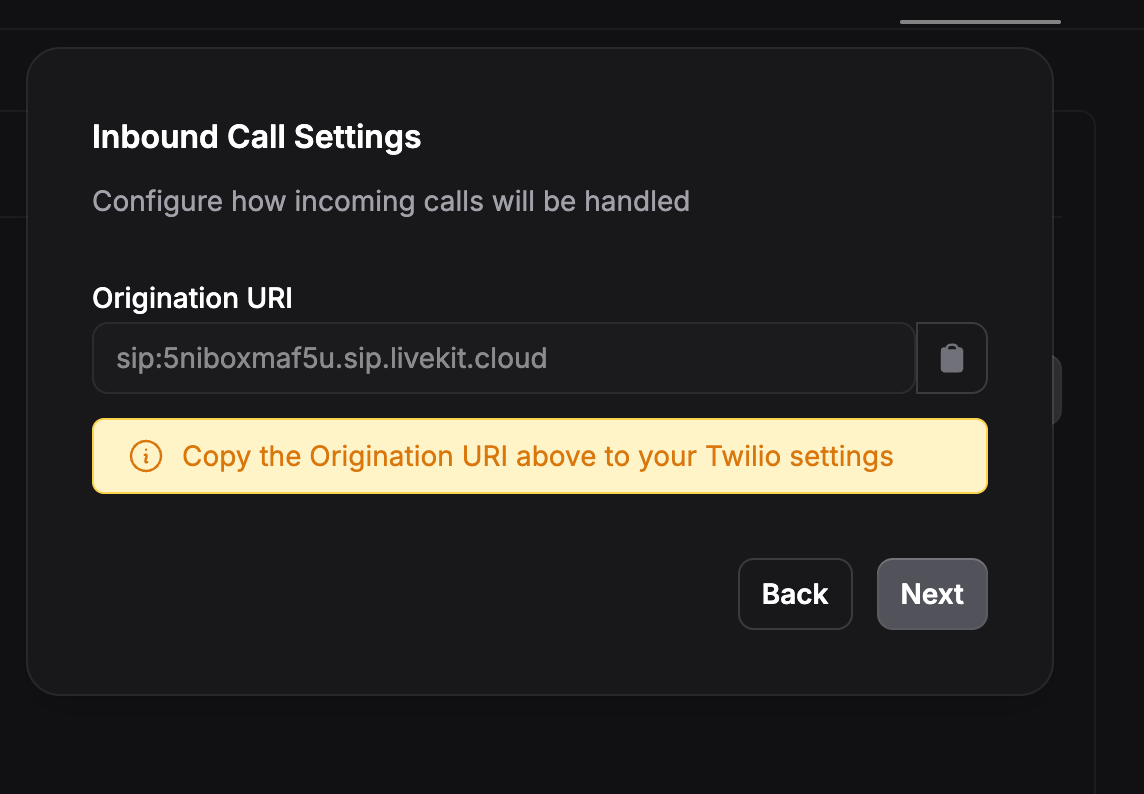
Create an Elastic SIP Trunk in Twilio
Brilo.In the trunk’s General tab, set the following.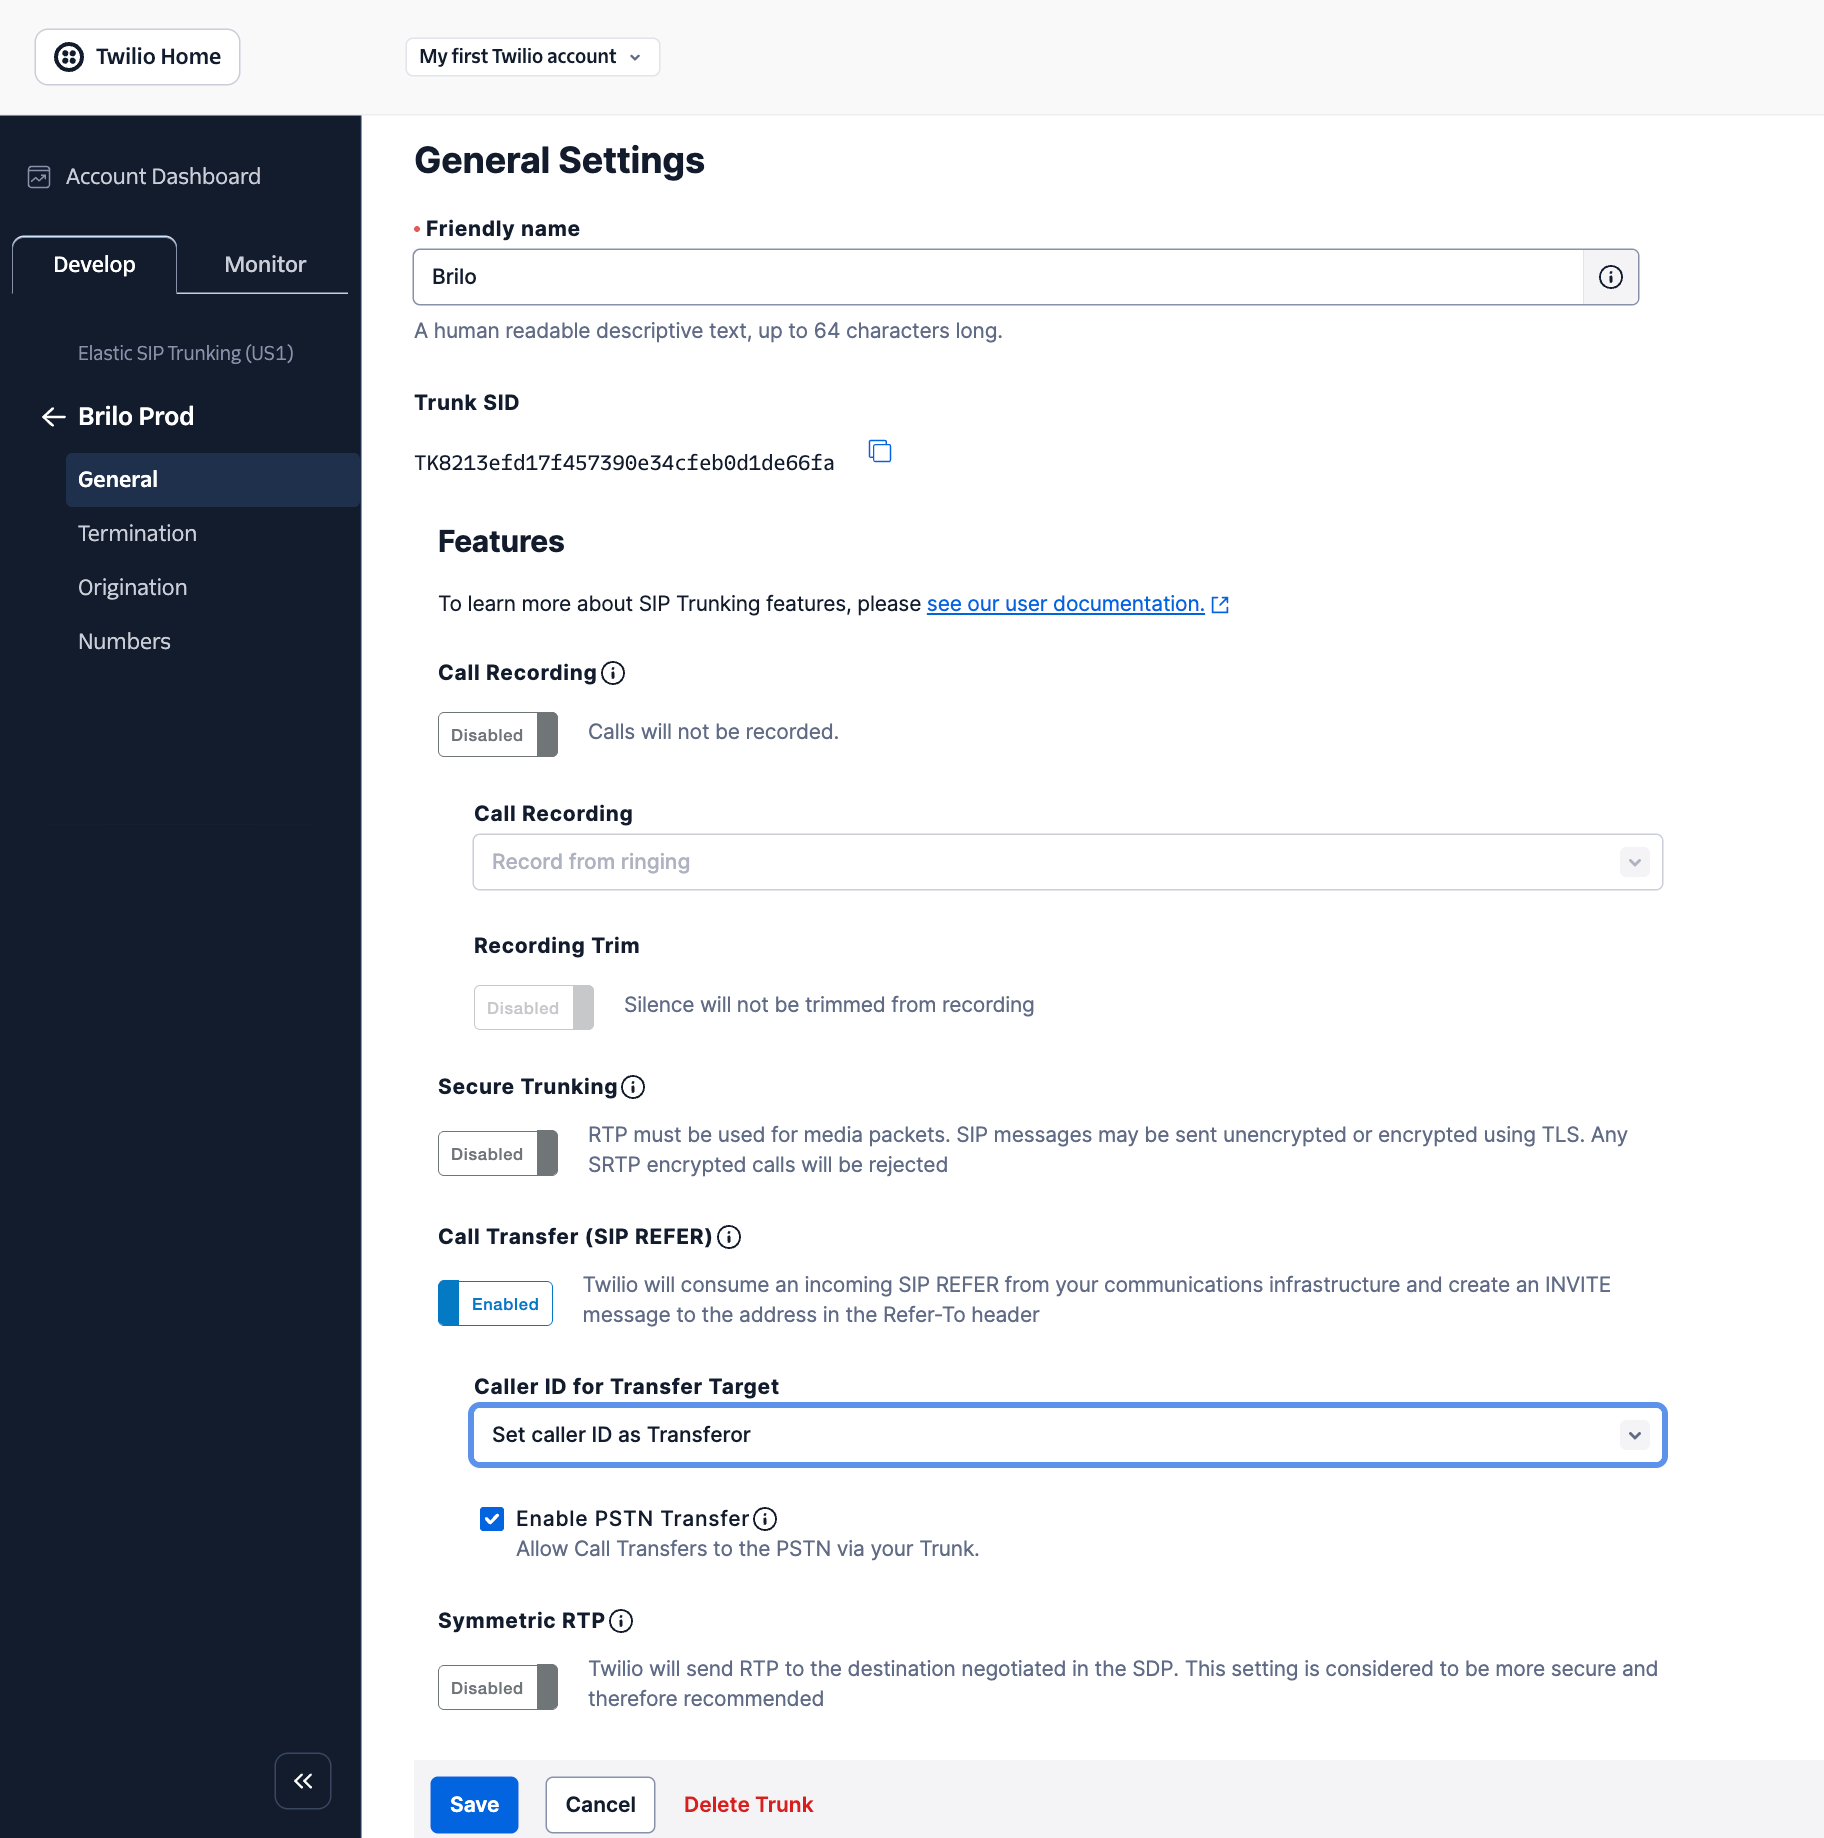
Paste the Origination URI
Configure Termination credentials
brilo-prod-acme. Twilio appends .pstn.twilio.com, giving you a full URI like
brilo-prod-acme.pstn.twilio.com. The prefix must be globally unique across all Twilio
customers, so if Twilio rejects your first choice, add a short random suffix such as
brilo-prod-acme-9k2. Save the full URI, because you paste it into Brilo in step 7.Create a Credential List. Scroll down to Authentication. Leave IP Access Control
Lists empty, because Brilo uses credential based authentication. In Credential Lists,
click the + button to create a new list with a username and a long random password. Save both
somewhere safe, because you paste them into Brilo in step 7.Save. Click Save at the bottom of the page.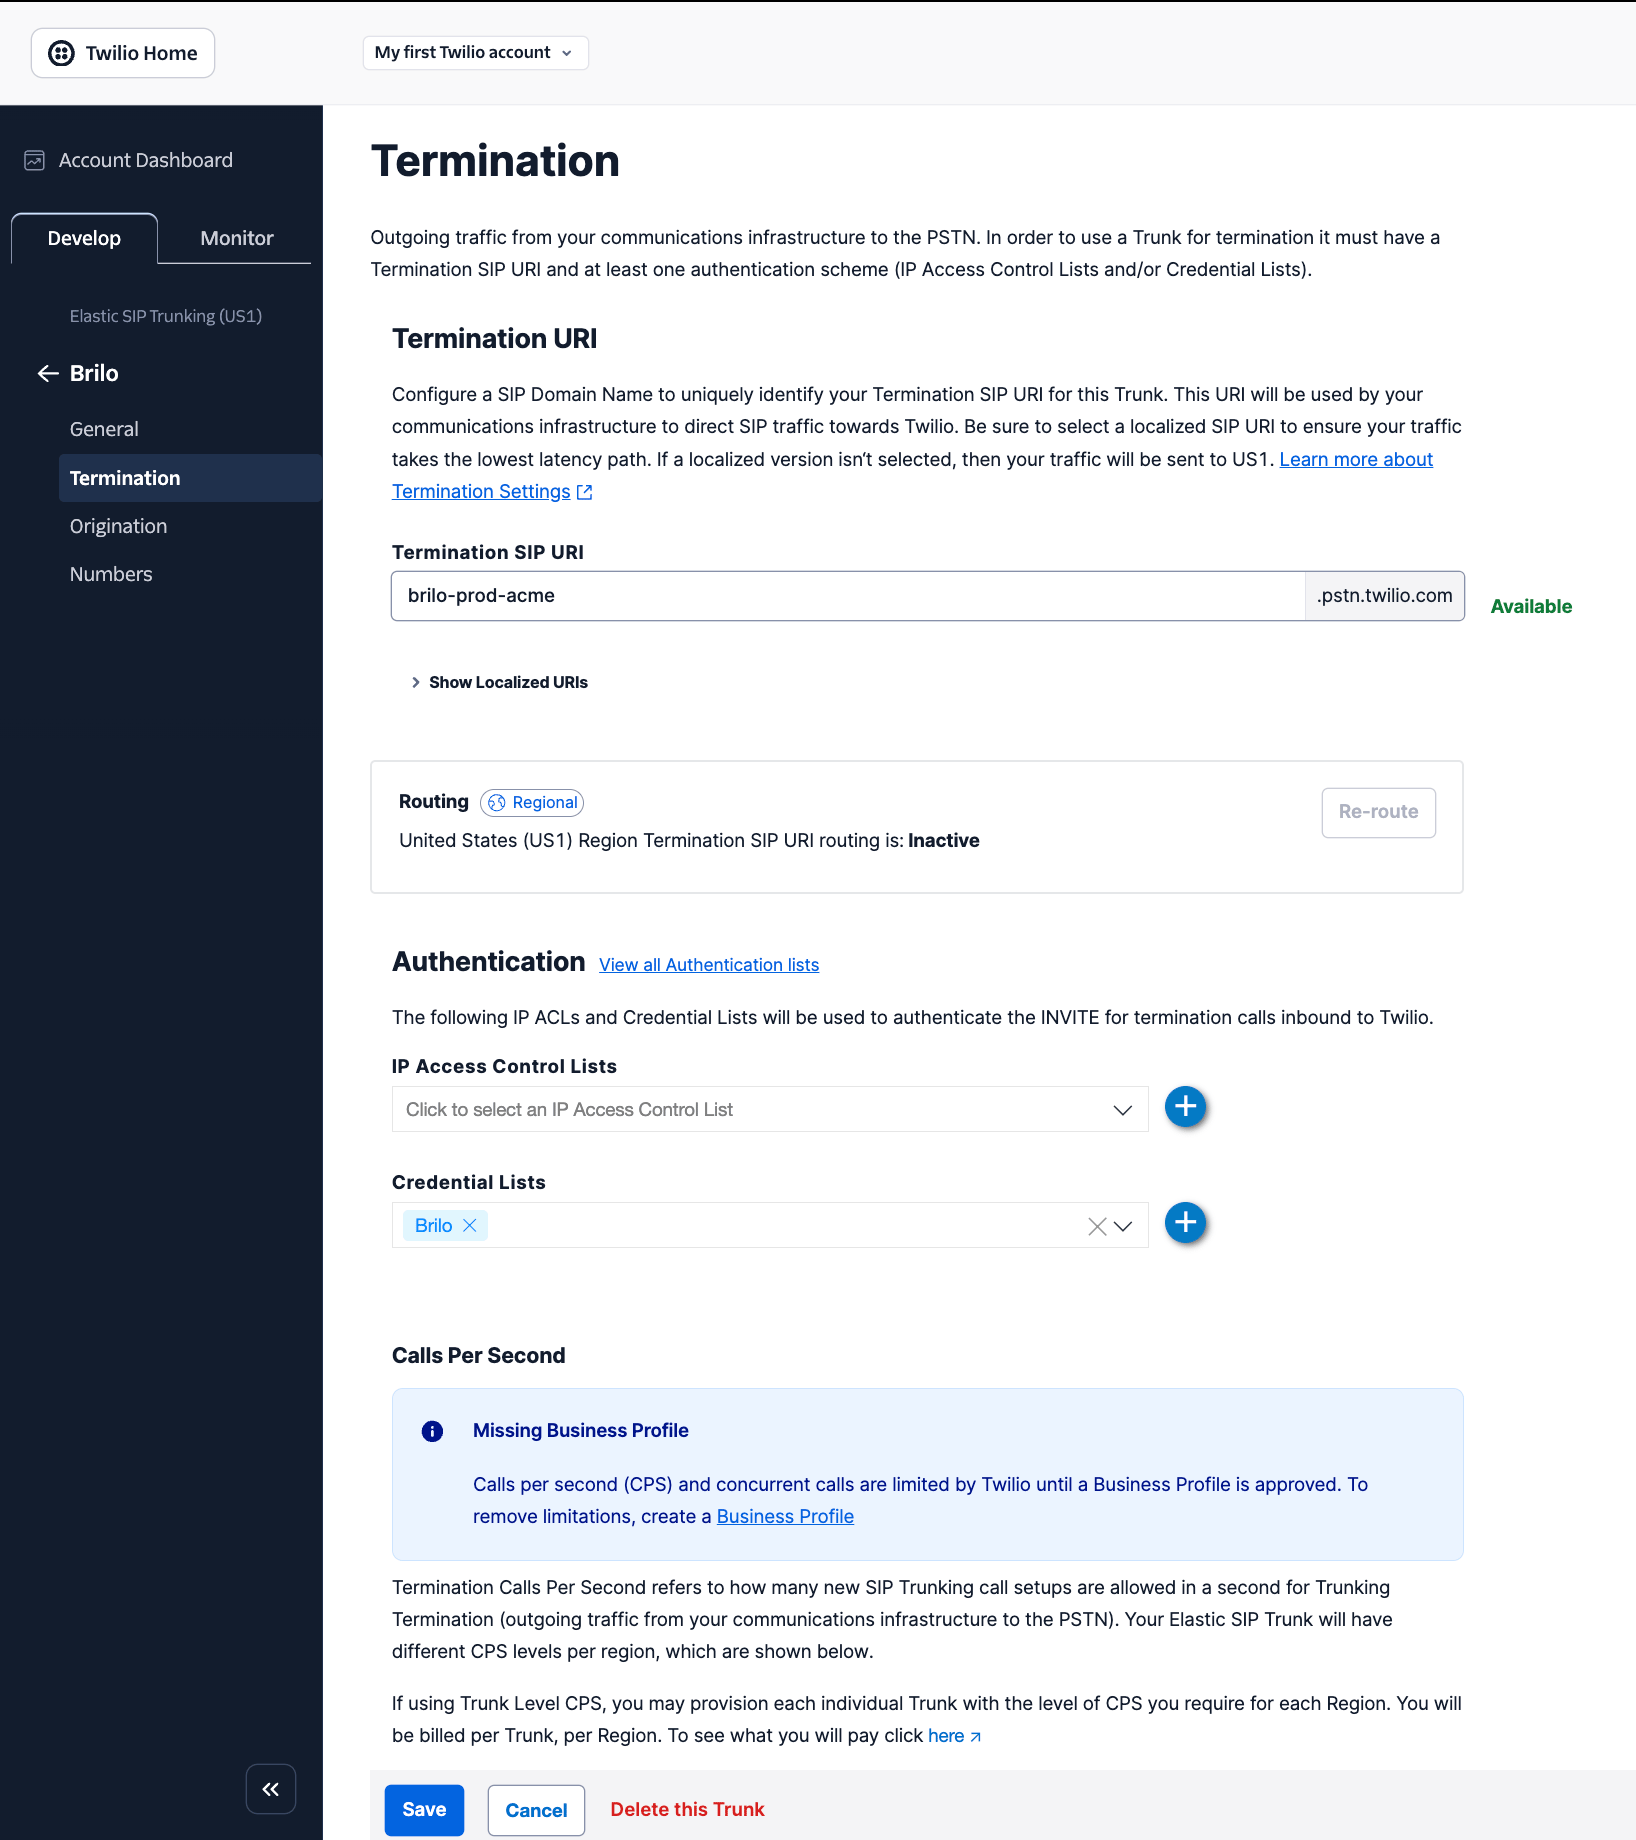
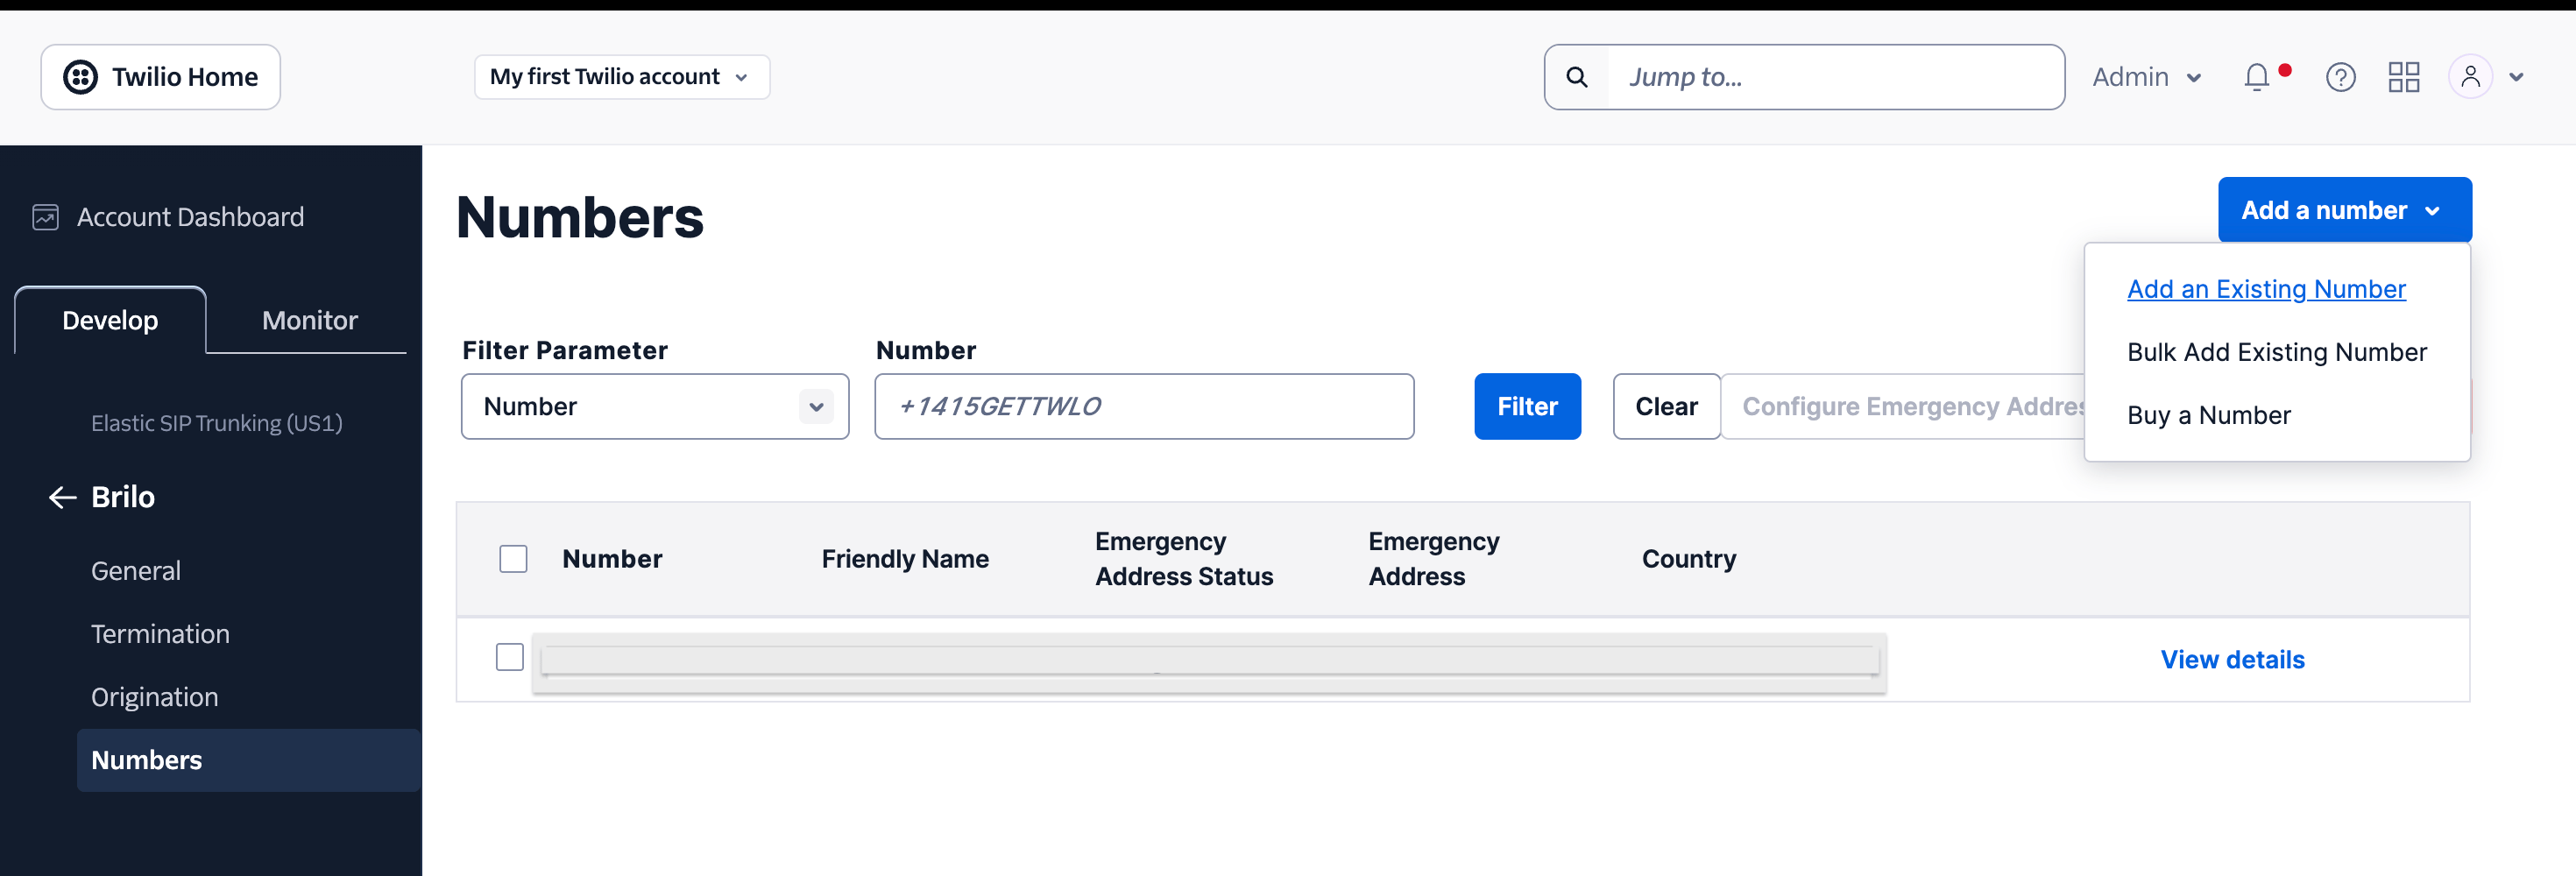
Assign your number to the trunk
- Click Add a number.
- Twilio shows the numbers in your account that are not already attached to another trunk. Select the DID you are importing.
- Click Add Selected and save.
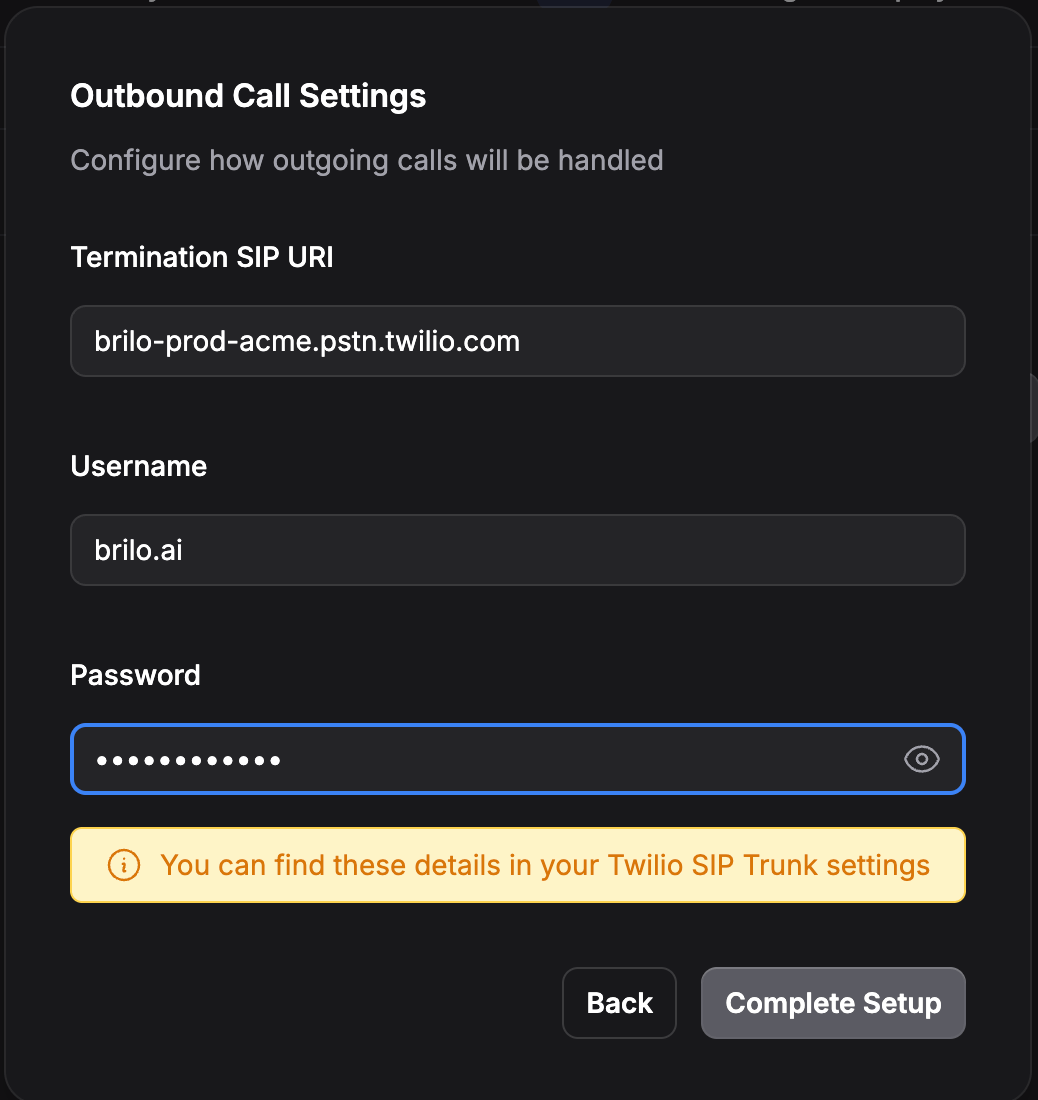
Finish in Brilo
- Termination SIP URI, from step 5
- Username, from your Credential List
- Password, from your Credential List
Enable SMS (optional)
- Twilio Account SID, which starts with
AC. Find it on your Twilio Console home page under Account Info, then Account SID. - Twilio Auth Token, also on the Twilio Console home page under Account Info, then Auth Token. Click the eye to reveal it.
SmsUrl becomes https://api.brilo.ai/twilio/webhook over POST), then encrypts and stores
the credentials. If any of that fails, the wizard shows an inline error so you can correct it.You will know it worked when
- Your number appears in your Phone Numbers list in Brilo, ready to attach to an agent.
- You call the number yourself and your agent answers. See Test your agent yourself.
- If you completed step 8, a text sent to the number reaches your agent, and an SMS your agent sends arrives.
What you can do once the number is imported
- Assign the number to an agent so it starts taking traffic.
- Turn on texting so your agent replies to messages on the same number.
- Register your business, which some countries require before texting works.
- Route calls to the right team once calls are arriving.
If it did not work
Warm transfer fails with Twilio error 32204
Warm transfer fails with Twilio error 32204
Outbound call fails with Twilio error 32011 (auth) or 13227 / 21215 (geo)
Outbound call fails with Twilio error 32011 (auth) or 13227 / 21215 (geo)
- Credential mismatch, error 32011. The Termination username and password you pasted into Brilo do not match the Credential List on your Twilio trunk. Re-enter them in the Brilo wizard, making sure there is no stray whitespace.
- Geographic Permissions block, error 13227 or 21215. Your Twilio account does not permit calls to the destination country. Enable it under Voice, then Settings, then Geo Permissions.
Inbound calls go to voicemail instead of Brilo
Inbound calls go to voicemail instead of Brilo
- The DID is not pointed at the SIP Trunk from step 6. Check Voice Configuration on the number.
- The Origination URI in step 4 has a typo. Confirm it matches what Brilo showed in step 2
exactly, including the
sip:prefix.
Australian, UK, or EU number will not activate
Australian, UK, or EU number will not activate
Brilo says the number was imported but no trunks were created
Brilo says the number was imported but no trunks were created
"Invalid Twilio credentials" when saving SMS setup in step 8
"Invalid Twilio credentials" when saving SMS setup in step 8
- Typo or whitespace in the SID or token. Re-copy both directly from Account Info in the Twilio Console.
- Wrong account. Your Account SID starts with
ACand is exactly 34 characters. If you use a Twilio sub-account, the SID and Auth Token must come from the same sub-account that owns the imported DID. - Rotated Auth Token. If you recently regenerated your Auth Token in Twilio, use the new one.
Inbound SMS is not reaching Brilo
Inbound SMS is not reaching Brilo
- The webhook was actually configured. Open Phone Numbers, then Manage, then
Active Numbers, then your DID, then Messaging Configuration. The A message comes
in field should be
https://api.brilo.ai/twilio/webhookover POST. If it is blank or wrong, re-run step 8 in the Brilo wizard. - Signature validation is failing. Brilo verifies every inbound SMS against your stored Auth Token. If you rotated the Auth Token in Twilio after importing, re-enter it in the Brilo wizard so the stored value matches.
- The number is not SMS capable. Check your number’s Capabilities in the Twilio Console. If SMS is disabled, enable it. Some countries require regulatory steps first.
- The webhook was manually changed. If you or another tool overwrote
SmsUrlafter step 8, re-run step 8 to restore it.
Outbound SMS fails with Twilio error 21606
Outbound SMS fails with Twilio error 21606
US outbound SMS blocked with error 30007 or 30034
US outbound SMS blocked with error 30007 or 30034
FAQ
Does Brilo work with Twilio?
Does Brilo work with Twilio?
Do I need a paid Twilio plan?
Do I need a paid Twilio plan?
Do I need a developer to import a Twilio number?
Do I need a developer to import a Twilio number?
What Twilio credentials does Brilo store?
What Twilio credentials does Brilo store?
Will my number stop working during the import?
Will my number stop working during the import?
Why is my number missing from the trunk list?
Why is my number missing from the trunk list?
What happens if I remove the number from Brilo?
What happens if I remove the number from Brilo?
Related
- Use your existing number for forwarding instead
- Assign a number to an agent for the next step
- Text messages for what SMS unlocks
- I cannot buy or change a number when something goes wrong